A Multi-client Server Design Pattern Using Simple Tcp/ip Messaging
-
Release Information
- About...
-
Release Notes
- New and Enhanced Features for InterSystems IRIS 2021.1
- General Upgrade Information
- Upgrade Compatibility Checklist for InterSystems IRIS 2021.1
- Known Issues and Notes
- Deprecated and Discontinued Features
- Licensing and Use of InterSystems Web Server
-
Supported Platforms
- Supported Technologies
- Supported Languages
- Discontinued Platforms and Technologies
- Supported Version Interoperability
- Cross-Product Technology Matrix
- First Looks
- Downloading Samples
- Searching the Documentation
-
Deployment
- About...
-
Containers
- About...
- First Look
- Try a Community Edition Container
- Running in Containers
-
InterSystems Cloud Manager
- About...
- InterSystems Cloud Manager
-
InterSystems Cloud Manager Guide
- ICM Overview
- Essential InterSystems Cloud Manager Elements
- Using InterSystems Cloud Manager
- ICM Reference
- Containerless Deployment
- Sharing ICM Deployments
- Scripting with ICM
- Using ICM with Custom and Third-Party Containers
- Deploying on a Preexisting Cluster
-
InterSystems Kubernetes Operator
- About...
- Using the InterSystems Kubernetes Operator
-
Installation Kit
- About...
- Installation Basics
-
Installation Guide
- Preparing to Install InterSystems IRIS
- Installing InterSystems IRIS on Microsoft Windows
- Installing InterSystems IRIS on UNIX®, Linux, and macOS
- Upgrading InterSystems IRIS
- Creating and Using an Installation Manifest
- Adding UNIX® Installation Packages to an InterSystems IRIS Distribution
-
Configuration
- About...
- Automating Configuration
-
Configuration Parameters
- Introduction to the Configuration Parameter File
- [Actions]
- [ComPorts]
- [config]
- [ConfigFile]
- [Databases]
- [Debug]
- [Devices]
- [DeviceSubTypes]
- [ECP]
- [ECPServers]
- [Gateways]
- [IO]
- [Journal]
- [LicenseServers]
- [Map]
- [MapMirrors]
- [MirrorMember]
- [Mirrors]
- [Miscellaneous]
- [Monitor]
- [Namespaces]
- [SQL]
- [SqlSysDatatypes]
- [SqlUserDatatypes]
- [Startup]
- [Telnet]
-
Data Migration
- About...
- Server Migration
-
ISQL Migration Guide
- Overview
-
Transact-SQL (TSQL) Migration Guide
- Planning and Performing TSQL Migration
- InterSystems TSQL Constructs
- InterSystems TSQL Language Elements
- TSQL Commands
- TSQL Settings
- TSQL Functions
- TSQL Variables
- TSQL System Stored Procedures
- DataMove
- Adding Compiled Code
-
Administration
- About...
-
System Administration
- Using the Management Portal
- Configuring InterSystems IRIS
- Managing InterSystems IRIS
- Managing InterSystems IRIS Licensing
- Using InterSystems IRIS on Windows
- Using InterSystems IRIS on UNIX®, Linux, and macOS
- Connecting to Remote Servers
- Using Multiple Instances of InterSystems IRIS
- Configuring Third-Party Software to Work in Conjunction with InterSystems Products
- Feature Tracker Collects Usage Statistics
-
Monitoring
- About...
-
Monitoring Guide
- Monitoring InterSystems IRIS Using the Management Portal
- Using the InterSystems Diagnostic Report
- Using Log Monitor
- Using System Monitor
- Gathering Global Activity Statistics Using ^GLOSTAT
- Monitoring System Performance Using ^PERFMON
- Monitoring Routine Performance Using ^PROFILE
- Examining Routine Performance Using ^%SYS.MONLBL
- Monitoring Block Collisions Using ^BLKCOL
- Monitoring Performance Using ^SystemPerformance
- Monitoring Performance Using ^mgstat
- Monitoring Processes Using ^PERFSAMPLE
- History Monitor
- Monitoring InterSystems IRIS Using SNMP
- Monitoring InterSystems IRIS Using Web Services
- Monitoring InterSystems IRIS Using REST API
- Monitoring InterSystems IRIS Using the irisstat Utility
-
Error Reference
- General Error Messages
- SQL Error Messages
- TSQL Error Messages
- System Error Messages
- Messages Related to Productions
- System Alerting and Monitoring Application
-
Specialized System Tools and Utilities
- Introduction
- Using System Classes for National Language Support
- Customizing Start and Stop Behavior with ^%ZSTART and ^%ZSTOP Routines
- Extending Languages with ^%ZLANG Routines
- Controlling InterSystems IRIS from a Windows Client
- Using ^GBLOCKCOPY for Fast Global Copies
- Using Switches
- Notes on Managing InterSystems IRIS via Routines
- Process Management
- Using cvendian for Byte Order Conversion
-
Architecture
- About...
-
Mirroring and High Availability
- About...
- High Availability Solutions
-
High Availability Guide
- Failover Strategies for High Availability
- Mirroring Overview
- Mirroring Architecture and Planning
- Configuring Mirroring
- Managing Mirroring
- Mirror Outage Procedures
-
Scalability
- About...
-
First Looks
- Scaling for User Volume
- Scaling for Data Volume
-
Scalability Guide
- InterSystems IRIS Scalability Overview
- Vertically Scaling InterSystems IRIS
- Horizontally Scaling for User Volume with Distributed Caching
- Horizontally Scaling for Data Volume with Sharding
-
Resiliency and Data Integrity
- About...
- First Look
-
Data Integrity Guide
- Introduction to Data Integrity
- Write Image Journaling and Recovery
- Backup and Restore
- Journaling
- Data Consistency on Multiple Systems
-
Security
- About...
- About InterSystems Security
- System Management & Security
-
Securing Your Instance
- Security Strategy
- Prepare for InterSystems Security
- Tighten Security for an Instance
- Security Advisor
- Secure InterSystems Processes and Operating-System Resources
- Checklist for Hardening Your Deployment
-
Security Tutorial
-
Authentication
- Authentication Mechanisms
- InterSystems Authentication Components and Process
- Connection Tools and Access Modes
- InterSystems Services
- Specifying Authentication Mechanisms
- Two-Factor Authentication
- Users
- Predefined Users
- Cascading Authentication
- Kerberos Authentication
- Operating System Based Authentication
- Instance Authentication
- Example One: %Service_Console
- Example One: %Service_Console (cont.)
- Example One: %Service_Console (cont.)
- Example One: %Service_Console (cont.)
- Example Two: Web
- Example Two: Web (cont.)
- Delegated Authentication
- Delegated Authentication Setup
- ZAuthenticate
- LDAP Authentication
- LDAP Authentication Configuration
- Recap
-
Authorization
- Overview
- Assets and Resources
- Privileges
- Public Privileges
- Privileges, Roles, and Users
- Database Resources
- Namespaces
- Example Setup
- Example One: %Developer and %Operator Roles
- Example Two: %Development Resource
- Example Three: %DB_USER Resource
- Example Four: $SYSTEM.Security.Check
- Recap
-
Securing Applications
- Overview
- Three Types of Application Definitions
- Properties of Application Definitions
- Web Application Definitions
- Example Setup
- Example Setup (cont.)
- Example One: Disabling an Application
- Example Two: Protecting an Application with a Resource
- Example Three: Application Roles
- Example Four: Matching and Target Roles
- Privileged Routine Applications
- Example Setup
- Example Setup (cont.)
- Example: Creating a Privileged Routine Application Definition
- Example: Adding a Routine
- Example: Adding Application Roles
- Example: Executing the Privileged Routine Application
- Java, .NET, and Other Applications
- Recap
- Connection Tools, Access Modes, Services
- Code for Authorization Example
- Code for Authentication Example
- Code for Privileged Routine Example
- Creating a User
- Creating a Resource
- Creating a Role
- Adding a User to a Role
-
Security for Developers
- About...
-
SOAP Security
- Introduction
- Setup and Other Common Activities
- Creating and Using Policies
- WS-Policy Configuration Class Details
- Adding Security Elements Manually
- Adding Timestamps and Username Tokens
- Encrypting the SOAP Body
- Encrypting Security Header Elements
- Adding Digital Signatures
- Using Derived Key Tokens for Encryption and Signing
- Combining Encryption and Signing
- Validating and Decrypting Inbound Messages
- Creating Secure Conversations
- Using WS-ReliableMessaging
- Creating and Adding SAML Tokens
- Troubleshooting Security Problems
- Details of the Security Elements
- SQL Security
- Command-Line Security Utilities
-
Authentication and Authorization
- About...
-
First Looks
- Role-Based Access Control
- LDAP
-
Authentication Guide
- Introduction
- Kerberos Authentication
- Operating System–Based Authentication
- Instance Authentication
- Delegated Authentication
- Two-Factor Authentication
- Services
- Advanced Topics
-
Authorization Guide
- About InterSystems Authorization
- Assets and Resources
- Privileges and Permissions
- Roles
- User Accounts
- Applications
- Using Delegated Authorization
-
LDAP Guide
- LDAP and InterSystems IRIS®
- LDAP Authentication
- LDAP Authorization
- Other LDAP Topics
-
OAuth 2.0 & OpenID Connect
- Overview of OAuth 2.0 and OpenID Connect
- How InterSystems IRIS Supports OAuth 2.0 and OpenID Connect
- Using an InterSystems IRIS Web Application as an OAuth 2.0 Client
- Using an InterSystems IRIS Web Application as an OAuth 2.0 Resource Server
- Using InterSystems IRIS as an OAuth 2.0 Authorization Server
- Creating Configuration Items Programmatically
- Implementing DirectLogin()
- Certificates and JWTs (JSON Web Tokens)
-
Encryption
- About...
-
First Looks
- Database Encryption
- Public Key Infrastructure
- Public Key Infrastructure
-
Encryption Guide
- About Managed Key Encryption
- Key Management Tasks
- Using Encrypted Databases
- Using Data-Element Encryption
- Protecting Against Data Loss
- Handling Emergency Situations
- Additional Encryption Information
- FIPS 140–2 Compliance for Database Encryption
- Cryptographic Standards
-
TLS Guide
- About TLS
- About Configurations
- Configuring the InterSystems IRIS Superserver to Use TLS
- Configuring InterSystems IRIS Telnet to Use TLS
- Configuring Java Clients to Use TLS with InterSystems IRIS
- Configuring .NET Clients to Use TLS with InterSystems IRIS
- Configuring Studio to Use TLS with InterSystems IRIS
- Connecting from a Windows Client Using a Settings File
- Configuring InterSystems IRIS to Use TLS with Mirroring
- Configuring InterSystems IRIS to Use TLS with TCP Devices
- Configuring the Web Gateway to Connect to InterSystems IRIS Using TLS
- Establishing the Required Certificate Chain
- Auditing Guide
-
Embedded Language Development
- About...
- Data Model
-
Orientation Guide
- Introduction to InterSystems IRIS Programming
- A Closer Look at ObjectScript
- Classes
- Objects
- Persistent Objects and InterSystems IRIS SQL
- Namespaces and Databases
- InterSystems IRIS Security
- Localization Support
- Server Configuration Options
- What's That?
- Rules and Guidelines for Identifiers
- General System Limits
- Numeric Computing in InterSystems Applications
-
Globals
- About...
- First Look
- Multidimensional Data Access
-
Using Globals
- Introduction
- Global Structure
- Using Multidimensional Storage (Globals)
- SQL and Object Use of Multidimensional Storage
- Managing Globals
- Temporary Globals and the IRISTEMP Database
-
ObjectScript
- About...
- First Look
-
ObjectScript IDEs
- Connecting an IDE
- About Visual Studio Code
-
Using Studio
- Introduction to Studio
- Creating Class Definitions
- Adding Properties to a Class
- Adding Methods to a Class
- Adding Class Parameters to a Class
- Adding Relationships to a Class
- Adding Queries to a Class
- Adding Indices to a Class
- Adding Projections to a Class
- Adding XData Blocks to a Class
- Adding SQL Triggers and Foreign Keys to a Class
- Adding Storage Definitions to a Class
- Working with CSP Files
- Working with Routines and Include Files
- Using the Studio Debugger
- Using Studio Templates
- Studio Menu Reference
- Setting Studio Options
- Frequently Asked Questions About Studio
- Source Control Integration
-
Using Terminal
- Introduction to the Terminal
- Using the Terminal Interactively
- Controlling the Appearance and Behavior of the Terminal
- Using Terminal Scripts
- Script Command Reference
- Connecting to Remote Hosts
- Using the Terminal in Batch Mode
- Advanced Topics
- Object Data Access
-
Using ObjectScript
- Introducing ObjectScript
- Syntax Rules
- Data Types and Values
- Variables
- Operators and Expressions
- Regular Expressions
- Commands
- Callable User-defined Code Modules
- ObjectScript Macros and the Macro Preprocessor
- Embedded SQL
- Multidimensional Arrays
- String Operations
- Lock Management
- Transaction Processing
- Error Processing
- Command-line Routine Debugging
-
Class Definitions
- About...
-
Defining & Using Classes
- Basic Ideas in Class Programming
- Defining and Compiling Classes
- Package Options
- Defining and Referring to Class Parameters
- Defining and Calling Methods
- Working with Registered Objects
- Introduction to Persistent Objects
- Working with Persistent Objects
- Defining Persistent Classes
- Defining and Using Literal Properties
- Working with Collections
- Working with Streams
- Defining and Using Object-Valued Properties
- Defining and Using Relationships
- Other Options for Persistent Classes
- Defining Method and Trigger Generators
- Defining and Using Class Queries
- Defining and Using XData Blocks
- Defining Class Projections
- Defining Callback Methods
- Using and Overriding Property Methods
- Defining Data Type Classes
- Implementing Dynamic Dispatch
- Object-Specific ObjectScript Features
- Using the Populate Utility
- Using the %Dictionary Classes
- Using the Object Synchronization Feature
-
Class Definition Reference
- Class Definitions
- Class Keywords
- Foreign Key Keywords
- Index Keywords
- Method Keywords
- Parameter Keywords
- Projection Keywords
- Property Keywords
- Query Keywords
- Trigger Keywords
- XData Keywords
- Storage Keywords
- Classes Page
-
ObjectScript Reference
- Symbols and Abbreviations
- ObjectScript Commands
- Routine and Debugging Commands
- ObjectScript Functions
- ObjectScript Special Variables
- Structured System Variables
-
ObjectScript Tutorial
-
The Basics
- Introduction
- Class Methods
- Terminal
- VS Code - ObjectScript
- Do Command
- Class Methods and Routines
- Method Details
- Passing Arguments by Reference
- Return and Quit Commands
- Write Command
- Read Command
- Set Command
- Operator Precedence
- Syntax
- Common Errors
- Write (again) and Kill Commands
- If Construct
- Simple Conditions
- Complex Conditions
- Hands-On Exercise 1
- Class Compilation
- Controlling Execution Flow
- $Case Function
- For Construct
- While and Do/While Constructs
- Try/Catch Construct, and Throw Command
- Multiple Purpose Characters
- Hands-On Exercise 2
- Recap of Part 1
-
The Good Stuff
- Strings
- Storing a String
- Concatenation Operator
- Pattern Matching and Regular Expressions
- Pattern Matching Examples
- String Functions
- String Functions, continued
- Lists
- Compare Pieces and Lists
- Setting Substrings, Pieces, and List Items
- More List Functions
- Bitstrings
- Dates
- Hands-On Exercise 3
- JavaScript Object Notation (JSON)
- Arrays
- Ordered Trees
- Ordered Trees, continued
- Value and Existence, and the $Data Function
- Viewing and Killing Arrays
- Globals
- $Increment and $Sequence Functions
- Storage Method
- Storage Method, continued
- Example of Globals
- Hands-On Exercise 4
- Recap of Part 2
-
Using Globals
- $Order Function
- $Order Function, continued
- Working With Indexes
- $Order Loop
- Nested $Order Loops
- Starting Focused $Order Loops
- Ending Focused $Order Loops
- Hands-On Exercise 5
- Conversion Functions
- $Get Function
- Hands-On Exercise 6
- Database Integrity
- Lock Command
- Lock Command, continued
- Lock Command and $Test
- Transaction Processing
- Hands-On Exercise 7
- InterSystems IRIS Objects and SQL
- Object Methods
- Object Storage
- SQL Queries
- Recap Of Part 3
-
RightTriangle Example Class and Exercise Solutions
- Right Triangle Example Class
- Exercise 1: First Data Entry Class
- Exercise 2: Second Data Entry Class
- Exercise 3: Third Data Entry Class
- Exercise 4: Storage Method
- Exercise 5: First Lookup Class
- Exercise 6: Second Lookup Class
- Exercise 7: Third Lookup Class
- %Status Values
- Try-Catch
- Finding Class References
-
InterSystems API Manager (IAM)
- About...
- First Look
-
SQL
- About...
-
First Looks
- InterSystems SQL
- Optimizing SQL Performance
-
Using SQL
- Introduction to InterSystems SQL
- InterSystems SQL Basics
- Language Elements
- Identifiers
- Defining Tables
- Defining and Using Views
- Relationships Between Tables
- Modifying the Database
- Querying the Database
- Collation
- Implicit Joins (Arrow Syntax)
- Using Embedded SQL
- Using Dynamic SQL
- Using the SQL Shell Interface
- Using the Management Portal SQL Interface
- Importing SQL Code
- Using Triggers
- Defining and Using Stored Procedures
- Storing and Using Stream Data (BLOBs and CLOBs)
- Users, Roles, and Privileges
- Importing and Exporting SQL Data
-
Optimizing SQL
- Introduction to SQL Performance Optimization
- Defining and Building Indices
- Optimizing Tables
- Cached Queries
- Optimizing Query Performance
- SQL Performance Analysis Toolkit
- Interpreting an SQL Query Plan
- SQL Statements
- Frozen Plans
-
InterSystems SQL Reference
- Symbols and Syntax Conventions
- SQL Commands
- SQL Commands for IntegratedML
- SQL Predicate Conditions
- SQL Aggregate Functions
- SQL Window Functions
- SQL Functions
- SQL Unary Operators
- SQL Reference Material
-
Using the InterSystems SQL Gateway
- SQL Gateway Overview
- Using the InterSystems SQL Gateway
- Connecting the SQL Gateway via JDBC
- Connecting the SQL Gateway via ODBC
- Using the SQL Gateway Programmatically
-
Document Database
- Introducing InterSystems IRIS Document Database (DocDB)
- Managing Documents
- REST Client Methods
-
XML
- About...
-
XML Tools
- Introduction to InterSystems XML Tools
- Writing XML Output from Objects
- Importing XML into Objects
- Representing an XML Document as a DOM
- Encrypting XML Documents
- Signing XML Documents
- Using %XML.TextReader
- Evaluating XPath Expressions
- Performing XSLT Transformations
- Customizing How the InterSystems SAX Parser Is Used
- Generating Classes from XML Schemas
- Generating XML Schemas from Classes
- Examining Namespaces and Classes
- XML Background
-
XML Projections
- Introduction to Object-XML Projections
- Projecting Objects to XML
- Controlling Transformations of Values
- Handling Empty Strings and Null Values
- Controlling the XML Element and Attribute Names
- Specifying Namespaces for Elements and Attributes
- Controlling the Projection to XML Schemas
- Advanced Options for XML Schemas
- Special Topics
- Summary of XML Projection Parameters
-
Web Services
- About...
-
Web Gateway Configuration Guide
- Installing the Web Gateway
- Web Application Architecture
- Web Servers for Microsoft Windows
- Web Servers for UNIX, Linux, and macOS
- Web Gateway Operation and Configuration
- Alternative Configurations for Microsoft Windows
- Alternative Configurations for UNIX, Linux, and macOS
- Apache Considerations UNIX, Linux, and macOS
- Building Apache for IBM AIX®
- IIS Technical Notes
- Using Web Applications with a Remote Web Server
-
SOAP
- About...
-
Creating SOAP Web Services and Clients
- Introduction to Web Services and Web Clients in InterSystems IRIS
- Creating SOAP Web Services
- SOAP Message Variations
- Creating Web Clients
- SOAP Fault Handling
- Using MTOM for Attachments
- Using SOAP with Attachments
- Adding and Using Custom Header Elements
- Adding and Using WS-Addressing Header Elements
- SOAP Session Management
- Using the InterSystems IRIS Binary SOAP Format
- Using Datasets in SOAP Messages
- Fine-Tuning a Web Service in InterSystems IRIS
- Fine-Tuning a Web Client in InterSystems IRIS
- Troubleshooting SOAP Problems in InterSystems IRIS
- Summary of Web Service URLs
- Details of the Generated WSDLs
- Details of the Generated Classes
-
REST and JSON
- About...
- First Look
-
REST Services
- Introduction to Creating REST Services
- Using the /api/mgmnt Service
- Using the ^%REST Routine to Create REST Services
- Using the %REST.API Class to Create REST Services
- Modifying the Implementation Class
- Modifying the Specification Class
- Supporting CORS in REST Services
- Using Web Sessions with REST
- Securing REST Services
- Discovering and Documenting REST APIs
- Reference for the /api/mgmnt API
- OpenAPI Properties in Use
- Creating a REST Service Manually
-
REST API for Source Code
- Introduction to the InterSystems IRIS Source Code File REST API
- Source Code File REST API Tutorial
- Source Code File REST API Reference
-
Using JSON
- Introduction
- Creating and Modifying Dynamic Entities
- Iteration and Sparse Arrays
- Working with Datatypes
- Using the JSON Adaptor
- Quick Reference for Dynamic Entity Methods
-
Internet Utilities
- Introduction
- Sending HTTP Requests
- Sending and Receiving Email
- Creating, Writing, and Reading MIME Messages
- Using FTP
- Sending and Receiving IBM WebSphere MQ Messages
- Using SSH
- Other InterSystems %Net Tools
-
I/O Device Guide
- About I/O Devices
- I/O Devices and Commands
- Terminal I/O
- Local Interprocess Communication
- Current Page: TCP Client/Server Communication
- UDP Client/Server Communication
- Sequential File I/O
- Spool Device
- Printers
-
Advanced Concepts
- Locking & Concurrency
- Bits & Bitstrings
- Structured Logging
- Semaphores
- String Localization
- Process Memory
- Work Queue Manager
- Secure Logins
- Using %Library.File
-
%UnitTest Tutorial
-
Unit Testing Overview
- What is a Unit Test?
- Why Unit Test?
- xUnit Testing Frameworks
- Structure of %UnitTest and xUnit Frameworks
- Test Automation
- Test First Methodology
- Red – Green – Refactor
- Recap
-
Unit Testing with %UnitTest
- What is %UnitTest?
- Creating and Executing a Suite of Unit Tests
- %UnitTest Classes
- Assert Methods and Macros
- Creating Classes to Use in the Examples
- Example: Creating and Exporting a Test Class
- Example: Executing a Test
- Example: UnitTest Portal
- Example: Viewing the Report in the Unit Test Portal
- Setup and Tear Down
- Example: Adding Setup and Tear Down Methods to a Test
- Example: Executing a Test Using Setup and Tear Down Methods
- Options for Executing Tests: Test Specs and Qualifiers
- RunTest Examples
- DebugRunTestCase
- Exercises
- Recap
-
API Index
- Tools Index
-
Glossary
- Complete Glossary of Terms
-
External Language Development
- About...
- Native APIs
-
Using InterSystems External Servers
- Introduction to InterSystems External Servers
- Working with External Languages
- Managing External Server Connections
- Customizing External Server Definitions
- InterSystems External Server Requirements
- Quick Reference for the ObjectScript $system.external Interface
-
Java
- About...
-
First Looks
- Java Gateway
- Native API for Java
- Java Object Persistence with XEP
- JDBC and InterSystems Databases
-
Java Gateway
- Introduction to the Java Gateway
- Using Dynamic Object Gateways
- Using the Java Gateway in a Production
- Sample Code
- Mapping Specification
-
Using Java with InterSystems Software
- Document Overview
- InterSystems Java Connectivity Options
- Using the JDBC Driver
- Configuration and Requirements
- JDBC for Occasional Users
- JDBC Quick Reference
-
Using the Native SDK for Java
- Document Overview
- Introduction to the Java Native SDK
- Calling ObjectScript Methods and Functions
- Using Java Inverse Proxy Objects
- Working with Global Arrays
- Transactions and Locking
- Java Native SDK Quick Reference
-
Persisting Java Objects with InterSystems XEP
- Introduction
- Using XEP Event Persistence
- XEP Quick Reference
-
Implementing Third Party APIs
- Introduction
- JDBC Driver Support
- Apache Spark Support
- Hibernate Support
- JDBC
-
.NET
- About...
-
First Looks
- .NET Gateway
- Native API for .NET
- ADO.NET and InterSystems Products
- .NET Object Persistence with XEP
- ODBC and InterSystems IRIS
-
Using the Object Gateway for .NET
- Object Gateway Architecture
- Setting Object Gateway Server Properties
- Running an Object Gateway Server
- Using Dynamic Object Gateways
- Creating Static Proxy Classes
- Sample Code
- Mapping Specification
- Using the Object Gateway in a Production
-
Using .NET with InterSystems Software
- Document Overview
- Connecting to the InterSystems Database
- Configuration and Requirements
- ADO.NET Managed Provider for Occasional Users
- Using the Entity Framework Provider
- Quick Reference for the .NET Managed Provider
-
Using the Native API for .NET
- Introduction to the Native API
- Calling ObjectScript Methods and Functions
- Using .NET Reverse Proxy Objects
- Working with Global Arrays
- Transactions and Locking
- Native API for .NET Quick Reference
-
Persisting .NET Objects with InterSystems XEP
- Introduction
- Using XEP Event Persistence
- XEP Quick Reference
-
ODBC
- About...
-
Using the InterSystems ODBC Driver
- Overview
- Defining an ODBC Data Source on Windows
- Defining an ODBC Data Source on UNIX®
- ODBC Installation and Validation on UNIX® Systems
- ODBC Support for Python and Node.js
- Logging and Environment Variables
-
Python
- About...
- First Look
-
Using the Native API for Python
- Introduction to the Native API
- Working with Global Arrays
- Calling ObjectScript Methods and Functions
- Native API Quick Reference for Python
-
Node.js
- About...
- First Look
-
Using the Native API for Node.js
- Introduction to the Native API
- Working with Global Arrays
- Calling ObjectScript Methods and Functions
- Native API Quick Reference for Node.js
-
Callin
- The Callin Interface
- Using the Callin Functions
- Callin Function Reference
-
Callout
- Introduction
- Running Programs or System Commands with $ZF(-100)
- Creating an InterSystems Callout Library
- Invoking Callout Library Functions
- InterSystems Callout Quick Reference
-
Interoperability Productions
- About...
- First Look
-
Introducing Interoperability Productions
- Introduction to Interoperability Productions
- Connectivity Options
- Business Processes and Business Logic
- Other Production Options
-
Preparing to Create Productions
- Road Map to Using InterSystems IRIS Productions
- Planning an InterSystems IRIS Server Deployment
-
Best Practices
- Best Practices for Production Development
- Design Model for a Routing Production
- Converting Interfaces to Production Elements
-
Developing Productions
- About...
-
Developing Productions Using ObjectScript
- Introduction
- Programming Business Services, Processes and Operations
- Defining Messages
- Defining Business Services
- Defining Business Processes
- Defining Business Operations
- Defining an Alert Processor
- Defining Data Transformations
- Defining Business Metrics
- Defining an Enterprise Message Bank
- Using the Record Mapper
- Using the Complex Record Mapper
- Handling Batches of Records Efficiently
- Less Common Tasks
- Testing and Debugging
- Deploying a Production
- Life Cycle of a Production and Its Parts
-
Developing Productions Using Java and .NET
- Introduction
- Getting Started
- About Business Hosts and Adapters
- Messaging
- Inbound Adapters
- Outbound Adapters
- Business Services
- Business Processes
- Business Operations
- Running the External Server
- PEX API Reference
-
BPL and DTL
- First Look
-
Developing BPL Processes
- About BPL Processes
- Using the Business Process Designer
- Syntax Rules
- List of BPL Elements
- Handling Errors in BPL
-
Developing DTL Transformations
- Introduction to DTL Tools
- Creating Data Transformations
- Syntax Rules
- Adding Assign Actions
- Adding Other Actions
- Testing Data Transformations
-
BPL and DTL Reference
- BPL Elements
- DTL Elements
-
Using a Production as an ESB
- Enterprise Service Bus and Registry Overview
- Intended Audiences
- Accessing the Public Service Registry through the Public REST API
- Administering the Public Service and External Service Registries
- Configuring an ESB
- Configuring ESB Services and Operations
- Configuring an InterSystems IRIS System and Creating a Namespace
- Configuring a Web Application for a Pass-through Business Service
- Pass-through Service and Operation Walkthrough
- Service Registry Public API Reference
-
Configuring, Managing, and Monitoring Productions
- About...
-
Configuring Productions
- Introduction to Configuration Tasks
- Creating a Production
- Adding Business Hosts
- Configuring Settings
- Configuring Alerts
- Defining Reusable Items for Use in Settings
- Defining Other Options for Productions
- Configuring the Enterprise Message Bank
- Identifying Enterprise Systems for Viewing and Monitoring
- Creating Dashboards
- Settings in All Productions
-
Managing Productions
- Introduction to Managing Productions
- Starting and Stopping Productions
- Purging Production Data
- Using the Archive Manager
- Managing Workflow Roles, Users, and Tasks
- Defining Publish and Subscribe Message Routing
- Controlling Data Storage for Productions
- Controlling Access to Management Portal Functions
- Finding Information on Menu Items
-
Monitoring Productions
- Core Concepts
- Monitoring All Namespaces
- Monitoring a Production
- Viewing, Searching, and Managing Messages
- Viewing the Event Log
- Enabling Tracing
- Viewing the Business Rule Log
- Viewing Business Process Instances
- Viewing the I/O Archive for a Production
- Viewing Messages from Multiple Productions
- Using the Enterprise Message Viewer
- Using the Enterprise Message Bank
- Viewing Interface Maps
- Finding Interface References
- Monitoring Alerts
- Monitoring Activity Volume
- Managing Port Usage
-
Push Notifications
- Push Notifications Overview
- Configuring and Using Push Notifications
-
Defining Workflows
- Overview of Workflow within Productions
- Developing a Workflow
- Including Custom Features in a Workflow
- Testing a Workflow
- Exploring the Workflow Sample
- Available Workflow Metrics
-
Testing Productions
- Testing Productions Tutorial
-
Testing Productions
- TestControl
- Callback Methods
- Auxiliary Methods
- Parameters and Properties
- Creating a Test - Summary
- Executing a Test
- Example Overview
- Example: Example Production
- Example: Production Test
- Example: OnAfterProductionStart
- Example: CheckResults
- Example: CheckErrors
- Example: Executing the Test
- Recap
- Creating Tutorial.ExampleOperation
-
Connecting Systems
- About...
- Supported Formats
- Supported Protocols
-
Email Adapters
- Introduction
- Using the Email Inbound Adapter
- Using the Email Outbound Adapter
- Reference for Settings
-
File Adapters
- Introduction
- Using the File Inbound Adapter
- Using the File Outbound Adapter
- Using the File Passthrough Service and Operation Classes
- Reference for Settings
-
FTP Adapters
- Introduction
- Using the FTP Inbound Adapter
- Using the FTP Outbound Adapter
- Reference for Settings
-
HTTP Adapters
- About the HTTP Adapters
- Using the HTTP Inbound Adapter
- Using the HTTP Outbound Adapter
- Reference for Settings
-
Java Messaging Service (JMS)
- JMS Overview
- Configuring and Using JMS Business Services and Operations
- Creating Custom JMS Services and Operations Using the Adapter
-
IBM WebSphere MQ Adapters
- About the IBM WebSphere MQ Adapters
- Using the IBM WebSphere MQ Inbound Adapter
- Using the IBM WebSphere MQ Outbound Adapter
- Troubleshooting
- Reference for Settings
-
MQTT Adapters
- Introduction to Message Queuing Telemetry Transport (MQTT)
- Using the MQTT Adapters
- Configuring and Using the MQTT Passthrough Business Service and Operation
- Reference for Settings
-
REST Services and Adapters
- Overview of Using REST in Productions
- Creating REST Services in Productions
- Creating REST Operations in Productions
-
SOAP Services and Web Clients
- About SOAP and Web Services
- Creating a Web Service in a Production
- Creating a Web Client in a Production
- Configuring a Production for SOAP Services
- Using the SOAP Inbound Adapter
- Older Web Service Variation
- Reference for Settings
-
SAP Java Connector
- Overview
- Setup Tasks
- Using the SAP Java Connector
-
SQL Adapters
- About the SQL Adapters
- Using the SQL Inbound Adapter
- Using the SQL Outbound Adapter
- Creating Adapter Methods for SQL
- Using Result Sets
- Using Snapshots
-
TCP Adapters
- Introduction
- Using the Inbound TCP Adapters
- Using the Outbound TCP Adapters
- Special Topics
- Reference for Settings
-
Managed File Transfer
- First Look
-
MFT Services
- Introduction
- Prerequisites and Configuration
- Enabling a Production to Use MFT Services
- Using the MFT API for InterSystems IRIS
-
Routing EDIFACT, X12, and XML Documents
- About...
-
Using Virtual Documents in Productions
- Virtual Documents
- Schema Definitions
- Virtual Property Paths
- Using Virtual Documents in a Production
- Defining Search Tables
- Controlling Message Validation
- Creating Custom Schema Categories
- Portal Tools
- Syntax Guide for Virtual Property Paths
- Common Settings
-
EDIFACT
- Introduction
- Available Tools
- Configuring the Production
- Additional Steps
- Reference for Settings
-
X12
- Introduction
- X12 Schemas and Available Tools
- Configuring the Production
- Creating an X12 Data Transformation
- Handling X12 Interchanges
- Reference for Settings
-
XML
- Introduction
- Available Tools
- Configuration Steps
- Overview of Property Paths in XML Virtual Documents
- Specifying Schema-dependent Paths for XML Virtual Documents
- Specifying DOM-style Paths for XML Virtual Documents
- Defining Data Transformations for XML Virtual Documents
- Defining Rule Sets for XML Virtual Documents
- Defining Search Tables for XML Virtual Documents
- XML-Enabled Objects Compared to XML Virtual Documents
- Reference for Settings
-
Developing Business Rules
- About Business Rules
- Introduction to the Rule Editor
- Creating and Editing Rule Sets
- Debugging Routing Rules
- Utility Functions for Use in Productions
-
Analytics and Data Science
- About...
- InterSystems IRIS Adaptive Analytics
-
Business Intelligence
- About...
-
BI Introduction
- Introduction to Business Intelligence
- Introduction to the Business Intelligence User Interfaces
- Introduction to the Other Business Intelligence Tools
- Business Intelligence Glossary
-
BI Modeling
- Introduction
- Basic Concepts
- Summary of Model Options
- Principles and Recommendations
- Defining Models for InterSystems Business Intelligence
- Compiling and Building Cubes
- Defining Dimensions, Hierarchies, and Levels
- Details of Defining Levels
- Defining Properties
- Defining Measures
- Defining Listings
- Defining Listing Fields
- Defining Calculated Members
- Defining a Named Set
- Defining Subject Areas
- Defining Listing Groups
- Reference Information for Cube Classes
- Reference Information for Subject Area Classes
- Details for the Fact and Dimension Tables
-
BI Advanced Modeling
- Defining Computed Dimensions
- Defining Shared Dimensions and Compound Cubes
- Defining Cube-Cube Relationships
- Using Text Analytics in Cubes
- Defining Term Lists
- Defining Worksheets
- Defining Quality Measures
- Defining Basic KPIs
- Defining KPIs with Filters and Listings
- Defining Advanced KPIs
- Defining Plug-ins
- Using Cube Inheritance
- Defining Intermediate Expressions
- Other Options
- Reference Information for KPI and Plug-in Classes
- Generating Secondary Cubes for Use with Text Analytics
-
Using Dashboards and the User Portal
- Introduction to the User Portal
- Using the Portal Features
- Orientation to Dashboards
- Using Dashboards
- Using the Pivot Analysis Window
-
BI Dashboards
- Introduction to Dashboards
- Creating and Modifying Dashboards
- Specifying Common Widget Options
- Adding Pivot Table Widgets
- Adding Chart Widgets
- Customizing the Appearance of a Chart Widget
- Adding Meter Widgets
- Adding Scorecard Widgets
- Adding Other Widgets
- Defining and Using Themes
- Adding Widget Controls
-
Implementing InterSystems IRIS Business Intelligence
- Overview
- Performing the Initial Setup
- Configuring Settings
- Defining Data Connectors
- Performance Tips
- Defining Custom Actions
- Accessing Dashboards from Your Application
- Keeping the Cubes Current
- Executing Business Intelligence Queries Programmatically
- Performing Localization
- Packaging Business Intelligence Elements into Classes
- Creating Portlets for Use in Dashboards
- Other Development Work
- Setting Up Security
- Using Cube Versions
- How the Analytics Engine Works
- Using the MDX Performance Utility
- Diagnostics for InterSystems Business Intelligence
- Other Export/Import Options
- Business Intelligence and Disaster Recovery
-
BI Analyzer
- Introduction to the Analyzer
- Creating Pivot Tables
- Filtering Pivot Tables
- Defining Calculated Elements
- Defining and Using Pivot Variables
- Customizing Pivot Tables
- Working with Pivot Tables
- Performing Ad Hoc Analysis
- Configuring InterSystems IRIS for PDF Output
-
Using MDX
- Background
- Introduction to MDX Queries
- Working with Levels
- Working with Dimensions and Hierarchies
- Working with Sets
- Tuples and Cubes
- Filtering a Query
- Adding Summaries
- Creating Calculated Measures and Members
-
MDX Reference
- Basic Rules
- Expression Types
- MDX Statements and Clauses
- MDX Functions
- Intrinsic Properties
- NOW Member for Time Levels
- Quick Function Reference
- Power BI
-
BI Clients
- Introduction
- DeepSee.js
- Business Intelligence REST API
-
BI Tutorial
- Getting Started
- Introduction to Cube Elements
- Creating a Cube
- Expanding the Cube Definition
- Creating Subject Areas
- Creating and Packaging Pivot Tables and Dashboards
-
Apache Spark
- About...
-
Using the InterSystems Spark Connector
- Document Overview
- Introduction
- Spark Connector Data Source Options
- Using Spark Connector Extension Methods
- Spark Connector Best Practices
- Spark Connector Internals
- Spark Connector Quick Reference
-
Machine Learning
- About...
-
Using IntegratedML
- Introduction to ML
- IntegratedML Basics
- Providers
- ML Configurations
- Model Maintenance
- About AutoML
- SQL Commands
- SQL Functions
-
Text Analytics (Natural Language Processing)
- About...
- Text Analytics with InterSystems Products
-
Using NLP
- Conceptual Overview
- NLP Implementation
- Domain Architect
- REST Interface
- Alternatives for Creating an NLP Environment
- Loading Text Data Programmatically
- Performance Considerations when Loading Texts
- NLP Queries
- Semantic Attributes
- Stemming
- Skiplists
- Filtering Sources
- Text Categorization
- Dominance and Proximity
- Custom Metrics
- Smart Matching: Creating a Dictionary
- Smart Matching: Using a Dictionary
- User Interfaces
- IRIS Natural Language Processing (NLP) Tools
- iKnow Web Services
- KPIs and Dashboards
- Customizing NLP
- Language Identification
- Domain Parameters
-
SQL Search
- About...
- First Look
-
Using SQL Text Search
- InterSystems SQL Search Tool
- SQL Search REST Interface
-
Unstructured Information Management Architecture
- About...
- InterSystems IRIS and UIMA
-
Using UIMA
- Overview
- Predictive Modeling Markup Language
-
InterSystems Reports
- Introduction
- InterSystems Reports Designer
- InterSystems Reports Server with InterSystems IRIS
TCP Client/Server Communication
This chapter describes how to set up remote communication between InterSystems IRIS® data platform processes using TCP/IP. For local communication between processes using pipes or using Interjob Communication (IJC) devices, refer to the Local Interprocess Communication chapter of this manual.
InterSystems IRIS supports two Internet Protocols (IP): TCP and UDP. These Internet Protocol allow InterSystems IRIS processes to communicate with processes on local or remote systems, whether or not those processes are running InterSystems IRIS.
-
TCP: the InterSystems IRIS Transmission Control Protocol (TCP) binding. Establishes a two-way connection between a server and a single client. Provides reliable byte stream transmission of data with error checking and correction, and message acknowledgement.
-
UDP: the InterSystems IRIS User Datagram Protocol (UDP) binding. Provides two-way message transfer between a server and a large number of clients. UDP is not connection-based; each transmission of data packets is an independent event. Provides fast and lightweight data transmission for local packet broadcasts and remote multicasting. Inherently less reliable than TCP. Does not provide message acknowledgement. For details, refer to the UDP Client/Server Communication chapter of this manual.
The TCP binding connects InterSystems IRIS to a widespread networking standard so that basic features of the underlying network protocol are available to InterSystems IRIS users through I/O commands.
The TCP/IP protocol allows systems to communicate even if they use different types of network hardware. For example, TCP, through an Internet connection, transmits messages between a system using Ethernet and another system using Token Ring. TCP controls the accuracy of data transmission. IP, or Internet Protocol, performs the actual data transfer between different systems on the network or Internet.
Using TCP binding, you can create both client and server portions of client-server systems. In the client-server type of distributed database system, users on one or more client systems can process information stored in a database on another system, called the server.
TCP Connections Overview
To create a client-server relationship between systems, you must follow a particular set of conventions:
-
Your systems must be connected with appropriate networking hardware and software, including TCP/IP protocol software.
-
Systems communicate with each other through a TCP port. The processes at both ends of the connection must use the same port number.
-
You specify either the TCP port number, or the devicename of the device that represents it, as the device in InterSystems IRIS OPEN, USE, and CLOSE commands.
Using these conventions, the general procedure of establishing a TCP binding connection is:
-
The server process issues an OPEN command to a TCP device.
-
The server process issues a USE command, followed by a READ command, awaiting input from the client process. The server must be listening before a client can establish a connection. The initial READ command completes when the client has opened the connection and sent some data. You can include the "A" mode parameter in the OPEN command to make the initial READ complete as soon as the server accepts the connection.
-
The client process issues an OPEN command that specifies the TCP device to which it is connecting.
-
The client process issues a USE command followed by a WRITE command to complete the connection. InterSystems IRIS copies all characters in the WRITE command(s) to a buffer. It does not write them to the network until you issue a WRITE ! or WRITE # command to flush the buffer.
-
After the server has read the characters that the client sent in its first WRITE command, both sides can continue to issue READ and WRITE commands. There is no further restriction on the order of these commands to the same port.
-
Either side can initiate the closing of a connection with the CLOSE or HALT command. Closing the client side first is preferable. If the server needs to disconnect so that it can accept a connection from another client process, it can instead issue a WRITE *-2 command.
Note:
This procedure assumes that both the client and server are InterSystems IRIS processes (though either process can be a non-InterSystems IRIS process).
The following sections detail how to use InterSystems IRIS I/O commands to create a TCP binding between client and server processes.
OPEN Command for TCP Devices
Both server and client processes use the ObjectScript OPEN command to initiate a connection. The server completes the connection by issuing a READ command, which receives the client OPEN command and first data transmission.
Note:
If you issue an OPEN command on a TCP device that has already been opened, this second OPEN command is treated as a USE command. That is, the hostname and port parameters are ignored (retaining the first OPEN command values) and the mode and terminators parameters are updated.
Using the OPEN Command
The OPEN command reserves a TCP binding device for your use. The syntax is:
OPEN devicename:parameters:timeout:mnespace
where
| devicename | A string of the form |TCP| followed by some number of numeric digits. The numeric portion of the device name is called the device identifier. If the port number is not specified in the OPEN parameters, this device identifier must be a unique five-digit TCP port number. If the port number is specified in the OPEN parameters (which is the preferred practice), this device identifier can be any unique number (up to a maximum of 2147483647), so long as all the TCP device names used by a single job are distinct. |
| parameters | Optional — A series of one or more device parameters, enclosed by parentheses and separated by colons (:). If a parameter is omitted, specify the colon separator for the missing parameter. (For a server-side OPEN the first parameter is always omitted.) The specific parameters are described below. If you specify only the first parameter (hostname), you can omit the parentheses. For example, the client-side open: OPEN "|TCP|7000":"127.0.0.1":10. If you specify no parameters, you can omit the parentheses, but you must retain the colon as a separator character. For example, the server-side open: OPEN "|TCP|7000"::10. |
| timeout | Optional — Maximum number of seconds InterSystems IRIS attempts to open the TCP device. If it does not succeed within this interval, it sets $TEST to 0 and returns control to the process. If it succeeds, it sets $TEST to 1. Including a timeout in OPEN commands from the client prevents the client system from hanging if it tries to open a connection while the server is busy with another client. The server can have only one connection open at a time. |
| mnespace | Optional — Supported as it is for all ObjectScript OPEN commands. There is no predefined mnemonic space for TCP bindings. |
If you omit an OPEN argument, you can indicate its absence by specifying the colon separator.
The timeout argument, though optional, is strongly recommended because the success or failure of OPEN is indicated by the value of the $TEST special variable, and $TEST is only set if timeout is specified. $TEST is set to 1 if the open attempt succeeds before the timeout expires; if the timeout expires, $TEST is set to 0.
If a TCP connection attempt fails on WIndows systems, the TCP connection error is written to the InterSystems IRIS system error log (see InterSystems IRIS System Error Log in the "Monitoring InterSystems IRIS Using the Management Portal" chapter of the Monitoring Guide), for example, error code 10061 = WSAECONNREFUSED.
The following is an example of a client-side OPEN, where 7000 is the port number and "127.0.0.1" is the parameters argument (the hostname, specified as an IPv4 address):
SET dev = "|TCP|7000" OPEN dev : ( "127.0.0.1" : 7000 )
hostname Parameter
The hostname parameter is required for a client-side OPEN. The client-side parameters argument may be just the hostname, or the hostname followed by other colon-separated parameters. If you specify just the hostname parameter, you can omit the parameters parentheses.
The server-side parameters argument omits the hostname.
The hostname can be either the name of an IP host (from the local system's database of remote hosts) or an IP address in either IPv4 or IPv6 protocol format. Because these protocols are incompatible, both the server and the client must use the same Internet protocol or the transmission will fail.
An IPv4 address has the following format. n is a decimal integer in the range 0 through 255:
An IPv6 address has the following full format. h is a hexadecimal number with four hexadecimal digits:
Commonly, IPv6 addresses are abbreviated by eliminating leading zeros and replacing consecutive sections of zeros with a double colon (::); only one double colon may be used in an IPv6 address. By using IPv4 abbreviation rules, you can specify the IPv6 loopback address as "::1" (meaning that the first seven consecutive h sections all have the value 0000, and the leading zeros from the eighth section are eliminated).
You can use the OPEN keyword /USEIPV6 to specify which protocol to use. Further details on IPv4 and IPv6 formats can be found in the section "Use of IPv6 Addressing" in the chapter "Server Configuration Options" in the Orientation Guide for Server-Side Programming.
Supported Parameters
The parameters argument can be in either of the following formats:
(hostname{:port{:mode{:terminators{:ibufsiz{:obufsiz{:queuesize{:keepalivetime}}}}}}}) The parameters within the parameters argument are as follows:
| Parameter | Meaning |
|---|---|
| hostname | Optional — Either the name of an IP host, an IP address in IPv4 protocol format, or an IP address in IPv6 protocol format. Specified as a quoted string. A hostname is required for a client-side OPEN; omitted (represented by a placeholder colon) for a server-side OPEN. |
| port | Optional — If present, this is the TCP port number to use for the connection. If this port number is null or omitted, then the port number is derived from the numeric portion of the devicename. This parameter can either be a decimal port number or a service name, which is submitted to the local system's TCP service name resolver. |
| mode | Optional — A string of letter code characters enclosed in quotes. Letter codes may be specified in any order; because InterSystems IRIS executes them in left-to-right order, interactions between letter codes may dictate a preferred order in some cases. The default is packet mode. A mode string can consist of one or more of the following letter codes:
|
| terminators | Optional — A list of up to eight user terminator characters that will terminate reads on the TCP binding device. If you specify both T mode and terminators at the same time, T mode is ignored. |
| ibufsiz | Optional — Input buffer size. Internally, characters that have been read from the network but not yet delivered to the InterSystems IRIS program are buffered in a data area that can hold ibufsiz bytes. |
| obufsiz | Optional — Output buffer size. The maximum amount of data the TCP device can buffer between successive "SEND" operations. A SEND operation means to send the buffered data out to the network. WRITE !, WRITE #, and WRITE *-3 commands can generate SEND operations. When S mode is specified, SEND operations are generated automatically to send the contents of the output buffer whenever it gets too full. When done creating a message, however, the programmer must still use one of the SEND operations to make sure the message is sent. When S mode is not specified, if a WRITE operation would place enough data in the buffer to exceed the output buffer size, then a <WRITE> error occurs. Note that attempting to write a string that is in itself longer than the output buffer size always fails. |
| queuesize | Optional — An integer that specifies how many client jobs can queue for a connection to the server. Used for server-side OPEN only. The default is 5. The maximum value depends on the TCP implementation, but cannot exceed 1000. |
| keepalivetime | Optional — (Windows, AIX, and Linux only) Allows you to set a keepalive timer for this device that is different than the system default. Specify an integer number of seconds to keep alive the TCP connection. Valid values range from 30 to 432000. (432000 seconds is 5 days.) A value less than 30 defaults to 30. If omitted or set to 0, the system-wide default keepalive timer is used. See the /KEEPALIVE keyword option for further details. The keepalive timer does not necessarily start timing when the TCP device is opened. It typically begins timing when the connection has been established. That is, when the initial read-for-connect has completed successfully. |
Packet Mode
Packet mode is the default if no mode is specified. If stream mode is disabled, the mode defaults to packet mode.
In packet mode READ commands complete as soon as there is some data to return. Packet mode allows you to build an entire TCP segment in the output buffer, and then send it all at one time by issuing a WRITE *-3 or WRITE ! command.
If you issue WRITE *-1 to initiate a TCP SEND operation when there are no characters to be sent, you receive a <WRITE> error. If you issue WRITE of an empty string, you receive a <COMMAND> error.
The maximum size of the string you can send in packet mode is 1024 characters. If you exceed this limit without flushing the buffer, you receive a <WRITE> error.
Because TCP/IP ignores records with a length of 0, you receive a <WRITE> error if you flush the write buffer when there are no characters in it.
A WRITE command from server to client before the server has received a connection request produces a <WRITE> error on the server.
Carriage Return Mode (C mode)
This mode modifies processing of carriage returns on input and output.
On Output, WRITE ! generates "CR LF" and WRITE # generates "CR FF".
On input, with T mode enabled, the server tries to record an adjacent CR and LF or an adjacent CR and FF as a single terminator in $ZB. CR and LF are processed as separate terminators if they do not arrive within a short interval of each other. By default, the interval is 1 second.
Monitoring for Disconnect Mode (D mode)
This mode turns on or off asynchronous disconnect monitoring. This mode is activated by specifying the "D" mode character, or the /POLL or /POLLDISCON keyword parameter. When you specify +D, TCP disconnect monitoring is activated; when you specify –D, TCP disconnect monitoring is deactivated.
While activated, InterSystems IRIS polls the TCP connection roughly every 60 seconds. When it detects a disconnect, InterSystems IRIS issues a <DISCONNECT> error. Disconnect detection does not occur in idle jobs, such as a job suspended by a HANG command or a job waiting on a READ operation. InterSystems IRIS suspends all disconnect monitoring during a rollback operation to prevent a <DISCONNECT> error being issued. InterSystems IRIS resumes disconnect monitoring once the rollback concludes. This suspension applies both to a current TCP device with disconnect monitoring activated, and to a current device without disconnect monitoring that is connected to a TCP device with disconnect monitoring activated.
You can also check for TCP disconnect by using the Connected()![]() method of the %SYSTEM.INetInfo
method of the %SYSTEM.INetInfo![]() class.
class.
Escape Sequencing Processing Mode (E mode)
When the E mode is set, escape sequences in the input stream are parsed and placed into the $ZB special variable. Escape sequences must be 15 characters or less and must match the following syntax:
where:
type1 ::= '['['0':'?']*['':'/']*{'@':DEL} type2 ::= [';'|'?'|'O']['':'/']*{'0':DEL} The syntactic symbols used here mean:
| : | x:y means a specified range of characters from x through y in the ASCII sequence. |
| | | x|y means specify either x or y. |
| [ ] | Specify zero or one members of the specified set. |
| [ ]* | Specify zero, one, or more members of the specified set. |
| { } | Specify exactly one member of the specified set. |
When InterSystems IRIS sees an ESCAPE, it waits up to 1 second for the rest of the escape sequence to arrive. If the escape sequence does not match this syntax, or if it is longer than 15 characters, or if a valid escape sequence does not arrive within 1 second, InterSystems IRIS places the partial escape sequence in $ZB and sets the "BADESC" bit (256) in $ZA.
Send Immediate Mode (Q mode)
In send immediate mode, each WRITE command is output as its own packet. If you are not using send immediate mode, you must either include a terminator or issue the command WRITE *–3 to output a packet.
This mode is entered by specifying the "Q" mode character, or the /SENDIMMEDIATE (or /SEN) keyword parameter. To turn this option off, specify either of the following:
USE TCPDEVICE : ( / SEN = 0 ) USE TCPDEVICE : ( : : "-Q" )
To turn this option back on, specify either of the following:
USE TCPDEVICE : ( / SEN = 1 ) USE TCPDEVICE : ( : : "+Q" )
Send Immediate Mode, which creates one packet per write, is used in combination with /NODELAY mode, which immediately sends each packet as it is created. When both are on, the speed of transmission of a single burst of data is maximized. This is useful when timely delivery of each unit of data is critical, for example, in transmitting mouse movements. When both are off, a packet may contain multiple writes, and a transmission may contain multiple packets. This reduces network traffic and improves overall performance. The default for Send Immediate Mode is off. The default for /NODELAY mode is on.
Stream Mode (S mode)
In stream mode, InterSystems IRIS does not attempt to preserve TCP message boundaries in the data stream. On sending, if the data does not fit in the message buffer, InterSystems IRIS flushes the buffer before placing the data in it.
On receiving, data up to the maximum string length can be received. All reads wait for the full timeout for terminators to be reached or for the buffer to become full. When this mode is disabled (the default), you are in packet mode.
Jobbed processes that inherit TCP devices are automatically set to Stream format. You can reset the format with the USE command.
Buffer Sizes
The ibufsiz and obufsiz parameters for TCP devices specify the sizes of the internal InterSystems IRIS buffers for TCP input and output. They can take values between 1KB and 1MB on all supported platforms. However, operating system platforms may use different sizes for their own input and output buffers. If the operating system platform buffer is smaller than the InterSystems IRIS buffer (for example, 64KB vs 1MB), performance may be affected: a WRITE operation may require several trips to the OS to send the entire InterSystems IRIS buffer; a READ operation may return smaller chunks that are limited by the OS buffer size. For optimal performance, a user should experiment with the current OS to determine which values for ibufsiz and obufsiz produce optimal results.
Server-Side OPEN Command
When the server-side OPEN is processed, it establishes a TCP socket and listens on the socket for incoming connection requests on the appropriate port number. The port number is either specified explicitly in the parameter list, or derived from the numeric portion of the devicename. The OPEN returns immediately after the socket has been set up to listen.
If the OPEN does not succeed, another process may already be listening for connection requests on that port number.
The following example of a server-side OPEN shows a device specification that allows reading and writing of terminated strings up to the maximum string size, and uses maximum length read and write operations to consolidate use of the TCP channel.
OPEN "|TCP|4" : ( : 4200 : "PSTE" : : 32767 : 32767 )
The parameters argument in this example is as follows: because this is a server-side OPEN, the first parameter (hostname) is omitted. The second parameter explicitly specifies the port number (4200). The third parameter is the mode code characters. The fourth parameter (terminators) is omitted. The fifth parameter is the input buffer size. The sixth parameter is the output buffer size.
In the following example the port number is not specified as a parameter; it is derived from the numeric portion of the devicename. This example opens port 4200 with no specified parameters and a timeout of 10 seconds:
A server-side OPEN has default input buffer size (ibufsiz) and output buffer size (obufsiz) parameter values of 1,048,576 bytes (1 MB).
A server-side OPEN supports the optional queuesize parameter, and the optional "G" mode parameter. These options are not available to a client-side OPEN.
A server-side OPEN supports the optional /CLOSELISTEN keyword parameter. This option is not available to a client-side OPEN.
Client-Side OPEN Command
A client-side OPEN command differs from the server-side OPEN command in only one respect: the first device parameter must specify the host to which you are connecting. To specify the host, you include either a name that the client recognizes as a host, or an Internet address.
The OPEN succeeds as soon as the connection is established. At this point, you can read or write to the TCP device. However, if the server side of the connection is another InterSystems IRIS process, the server does not complete its side of the connection until some data has been sent from the client to the server with the WRITE command. Therefore, you must issue a WRITE command before you issue any READ commands.
For details, see the section "WRITE Command for TCP Devices".
Some examples of client-side OPEN commands are:
OPEN "|TCP|4" : ( "hal" : 4200 : : $CHAR ( 3 , 4 ) ) : 10
This command opens a connection to host hal on port 4200. It specifies no mode string. It specifies two terminators (ASCII $CHAR(3) and $CHAR(4)), and default input and output buffer sizes. It specifies a timeout of 10 seconds.
The following command is the same as the previous one, except that the destination is an explicit IP address in IPv4 format.
OPEN "|TCP|4" : ( "129.200.3.4" : 4200 : : $CHAR ( 3 , 4 ) ) : 10
You can use the OPEN keyword /USEIPV6 to specify which protocol to use. Further details on IPv4 and IPv6 formats can be found in the section "Use of IPv6 Addressing" in the chapter "Server Configuration Options" in the Orientation Guide for Server-Side Programming.
The following command connects to time-of-day server on remote host "larry" and prints the remote host's time of day in ASCII format on the principal input device. It uses the service name daytime, which the local system resolves to a port number:
OPEN "|TCP|4" : ( "larry" : "daytime" : "M" ) USE "|TCP|4" READ x USE 0 WRITE x
The following command sets x to "hello":
OPEN "|TCP|4" : ( "larry" : "echo" : "M" ) USE "|TCP|4" WRITE "hello" , ! READ x
The following command opens a connection to Internet address 128.41.0.73, port number 22101, with a 30-second timeout.
OPEN "|TCP|22101" : "128.41.0.73" : 30
OPEN and USE Command Keywords for TCP Devices
You can either use positional parameters (as described above) or keyword parameters. The following table describes the keywords for controlling TCP devices with both OPEN and USE commands. There are additional OPEN-only keywords (described later in this chapter) that can only be specified in the OPEN command. All keyword parameters are optional.
OPEN and USE Command Keywords for TCP Devices
| Keyword | Default | Description |
|---|---|---|
| /ABSTIMEOUT[=1] | 0 | Specifies read timeout behavior. Determines whether TCP should reinitialize the timeout period when data is received. If /ABSTIMEOUT=0 (the default) timeout is reset to its original value each time data is received. If /ABSTIMEOUT or /ABSTIMEOUT=1 the timeout period continues to count down while data is received. |
| /ACCEPT[=n] or /ACC[=n] | 0 | Corresponds to the "A" mode parameter character, which specifies that the initial read on the server terminates with a zero length string as soon as the connection from the client job is accepted. /ACCEPT and /ACCEPT=n for nonzero values of n enable A mode. /ACCEPT=n for a zero value of n disables A mode. |
| /CLOSEFLUSH[=n] | 1 | Specifies handling of data remaining in the output buffer when the device is closed. /CLOSEFLUSH and /CLOSEFLUSH=n for nonzero values of n flushes remaining data. /CLOSEFLUSH=n for a zero value of n discards remaining data. |
| /COMPRESS=str | "" | Specifies the stream data compression type. You can enable a compression type of ZLIB or ZSTD. You can specify /COMPRESS="" to disable compression. /COMPRESS="zlib" is equivalent to /GZIP=1. To compress a string, use %SYSTEM.Util.Compress() |
| /CRLF[=n] | 0 | Corresponds to the "C" mode parameter character, which modifies processing of carriage returns on input and output. /CRLF and /CRLF=n for nonzero values of n enable C mode. /CRLF=n for a zero value of n disables C mode. |
| /ESCAPE[=n] or /ESC[=n] | 0 | Corresponds to the "E" mode parameter character, which specifies that escape sequences in the input stream are parsed and placed into $ZB. /ESCAPE and /ESCAPE=n for nonzero values of n enable E mode. /ESCAPE=n for a zero value of n disables E mode. |
| /GZIP[=n] | 1 | Specifies GZIP-compatible stream data compression. /GZIP or /GZIP=n (for nonzero values of n) enables compression on WRITE and decompression on READ. /GZIP=0 disables compression and decompression. Before issuing /GZIP=0 to disable compression and decompression, check the $ZEOS special variable to make sure that a stream data read is not in progress. /GZIP compression has no effect on I/O translation, such as translation established using /IOTABLE. This is because compression is applied after all other translation (except encryption) and decompression is applied before all other translation (except encryption). For further information on WRITE with compressed data, refer to WRITE Control Characters in this chapter. |
| /IOTABLE[=name] or /IOT[=name] | If name is not specified, the default I/O translation table for the device is used. | Establishes an I/O translation table for the device. |
| /KEEPALIVE=n | system default | (Windows, AIX, and Linux only) Allows you to set a keepalive timer for this device that is different than the system default. An integer that specifies the number of seconds to keep alive the TCP connection. Same as the keepalivetime positional parameter. Valid values range from 30 to 432000. (432000 seconds is 5 days.) A value less than 30 defaults to 30. If omitted or set to 0, the system default is used. This setting can be disabled using /NOKEEPALIVE; once disabled, it cannot be re-enabled until this TCP device is closed. |
| /NODELAY=n | 1 | Specifies whether packets should be bundled or sent individually. If /NODELAY=1 (the default) each packet is immediately transmitted. If /NODELAY=0 the TCP driver bundles packages together using an optimization algorithm. This can cause a slight transmission delay for an individual packet, but by reducing network traffic it can improve overall performance. /NODELAY has no corresponding mode parameter character. Use of /NODELAY should be coordinated with use of /SENDIMMEDIATE. |
| /NOKEEPALIVE | If specified, the system-wide TCP keepalive timer is disabled for this device. InterSystems IRIS enables this timer by default when opening any TCP device; issuing the /NOKEEPALIVE option on OPEN or USE overrides this default. If /KEEPALIVE has been used to set a non-default keepalive timer, /NOKEEPALIVE disables that keepalive timer. Once you disable a keepalive timer there is no way to re-enable it until the TCP device is closed. See /KEEPALIVE. | |
| /NOXY[=n] | 0 | No $X and $Y processing: /NOXY or /NOXY=n (for nonzero values of n) disables $X and $Y processing. This option can improve performance when device $X/$Y is not used, for example with CSP. It can substantially improve performance of READ and WRITE operations. This option is the default setting for superserver worker jobs. When /NOXY=1, the values of the $X and $Y variables are indeterminate, and margin processing (which depends on $X) is disabled. /NOXY=0 enables $X and $Y processing; this is the default. /TCPNOXY is a deprecated synonym for /NOXY. |
| /OBCOUNT=n | 16 | The number of output buffers to use with /ZEROCOPY. The default number of output buffers is 16. The minimum number of output buffers is 2 and the maximum is 128. The value of n must be power of 2; if a non-power-of-2 value is specified, it is rounded up to a power of 2. |
| /PAD[=n] | 0 | Corresponds to the "P" mode parameter character, which specifies that output is padded with record terminator characters when WRITE ! (LF terminator) or WRITE # (FF terminator) is executed. /PAD and /PAD=n for nonzero values of n enable P mode. /PAD=n for a zero value of n disables P mode. |
| /PARAMS=str or /PAR=str | No default | Corresponds to the mode positional parameter. (It provides a way to specify a mode string in a position-independent way.) |
| /POLL[=n] or /POLLDISCON[=n] | Corresponds to the "D" mode parameter character, which specifies asynchronous monitoring for disconnect. /POLL or /POLL=1 corresponds to +D. /POLL=0 corresponds to -D. | |
| /PSTE[=n] | 0 | Corresponds to the "M" mode parameter character, which is a shorthand way to specify the P, S, T and E mode parameter characters. /PSTE and /PSTE=n for nonzero values of n enable P, S, T and E modes. /PSTE=n for a zero value of n disables these modes. |
| /SENDIMMEDIATE[=n] or /SEN[=n] | 0 | Corresponds to the "Q" mode parameter character, which specifies Send Immediate Mode. |
| /SSL="cfg[|pw] [|DNShost]" or /TLS="cfg[|pw] [|DNShost]" | No default | From a client, specifies that the device attempts to negotiate an SSL/TLS-secured connection according to the client's specified configuration and server requirements. When securing a socket as a server, specifies that the server requires a SSL/TLS-secured connection according to the server's specified configuration and any client requirements. cfg specifies the name of the configuration for the connection or socket. pw specifies the optional private key file password. DNShost specifies the fully qualified DNS hostname of a specific server, for use with the Server Name Indication (SNI) TLS extension. See below for details. This configuration name is used only the first time I/O is performed after the OPEN or USE command. Subsequent invocations are ignored. /SSL="" or /TLS="" is ignored. For more information, see InterSystems TLS Guide. IMPORTANT: The ability to include a password when opening a new or securing an existing TCP connection using SSL/TLS is for real-time interactive use only. You should never store a private key password persistently without protecting it. If you need to store such a password, use the PrivateKeyPassword property of the Security.SSLConfigs |
| /STREAM[=n] or /STR[=n] | 0 | Corresponds to the "S" mode parameter character, which specifies a stream mode of handling data that does not preserve TCP message boundaries. /STREAM and /STREAM=n for nonzero values of n enable S mode. /STREAM=n for a zero value of n disables S mode. |
| /TCPNOXY | Deprecated. A synonym for /NOXY. | |
| /TCPRCVBUF=n | Default receive buffer size | Set receive queue buffer size, in bytes. Can be used to increase the buffer size from the default value to support TCP protocol large windows. Large windows improve performance over links with long latencies or very high bandwidth. For appropriate values, consult your OS/hardware documentation. |
| /TCPSNDBUF=n | Default send buffer size | Set send queue buffer size, in bytes. Can be used to increase the buffer size from the default value to support TCP protocol large windows. Large windows improve performance over links with long latencies or very high bandwidth. For appropriate values, consult your OS/hardware documentation. |
| /TERMINATOR=str or /TER=str | No default | Corresponds to the terminators positional parameter, which establishes user-defined terminators. |
| /TMODE[=n] or /TMO[=n] | 0 | Corresponds to the "T" mode parameter character, which specifies CR, LF, and FF as standard read terminators. /TMODE and /TMODE=n for nonzero values of n enable T mode. /TMODE=n for a zero value of n disables T mode. |
| /TRANSLATE[=n] or /TRA[=n] | 1 | /TRANSLATE or /TRANSLATE=n for nonzero values of n enable I/O translation for the device. /TRANSLATE=n for a zero value of n disables I/O translation for the device. |
| /WAIT[=n] | 0 | Corresponds to the "W" mode parameter character, which causes output buffers not to be flushed by the WRITE ! and WRITE # commands. Rather, flushing waits until the next WRITE *-3 command. /WAIT and /WAIT=n for nonzero values of n enable W mode. /WAIT=n for a zero value of n disables W mode. |
| /WRITETIMEOUT[=n] | -1 | Establishes a timeout (in seconds) for TCP write operations. If a write does not complete within n seconds, InterSystems IRIS issues a <TCPWRITE> error. If a <TCPWRITE> error is issued, your application should immediately close the TCP device to prevent data loss. InterSystems IRIS will not attempt a TCP write operation following a <TCPWRITE> error. The minimum n value is system-dependent. If n is smaller than the minimum timeout value for the platform, InterSystems IRIS uses the platform minimum. No n value should be less than 2. The default (-1) indicates no timeout is enforced. |
| /XYTABLE[=name] or /XYT[=name] | If name is not specified, the default $X/$Y action table for the device is used. | Establishes a $X/$Y action table for the device. See /NOXY. |
| /ZEROCOPY[=bool] | 0 | If /ZEROCOPY or /ZEROCOPY=1 is specified, enable the ZEROCOPY feature for this TCP device. ZEROCOPY supports multiple output buffers for the TCP device in order to take advantage of MSG_ZEROCOPY on send(); the TCP device cannot re-use the output buffer until the buffer has been acknowledged by notification from the TCP stack. To set the number of output buffers for the TCP device use the /OBCOUNT keyword. If /ZEROCOPY=0 is specified, disable the ZEROCOPY feature for this TCP device. MSG_ZEROCOPY is supported in Linux 4.15 and later. If the operating system does not support MSG_ZEROCOPY, the ZEROCOPY of the TCP device is always disabled. |
SSL / TLS Components
The value of the TCP device OPEN or USE /SSL or /TLS keyword parameter is a quoted string. This string can have can have one, two, or three components, separated by the '|' character:
| cfg | The name of the SSL Configuration to use for this connection. This component is required. |
| pw | Optional — The password for the local private key file. This is intended for interactive applications only, when a user is being prompted to enter the password at run time. It should not be used with a persistently stored password. Use the Security.SSLConfigs.PrivateKeyPassword property for persistent storage. |
| DNShost | Optional — For SSL clients only. Specify either the server-selected certificate (for Hostname Verification) or the fully qualified DNS hostname of a specific server (for Server Name Indication). If you omit pw you must specify the placeholder '|' character. Hostname Verification is a feature that allows the client to check that the certificate it receives from a server includes a field with the hostname that the client tried to connect to. This is for use by client applications, such as %Net.HttpRequest(), that want to verify that the server X.509 certificate contains a fully qualified server DNS hostname matching the server name in the URL, either in the subjectAltName extension or the Subject CN field. This allows clients to detect cases where a man in the middle attack uses a valid certificate for the wrong domain. Server Name Indication (SNI) is a feature that allows the client to submit the hostname it's asking for to the server. This allows a server which handles multiple domains to select one of its multiple certificates to return. The server can select one which will match hostname checking on the client. |
The following are examples of valid /TLS keyword parameters:
/TLS="Client" /TLS="Client|password" /TLS="Client||www.intersystems.com" /TLS="Client|password|www.intersystems.com"
OPEN-Only Command Keywords for TCP Devices
The following table describes the keywords for controlling TCP devices that can only be specified in the OPEN command. There are additional OPEN/USE keywords (described earlier in this chapter) that can be specified with either the OPEN or USE command. All keyword parameters are optional.
OPEN-only Command Keywords for TCP Devices
| Keyword | Default | Description |
|---|---|---|
| /BINDTO[=address] | Binds to a specified local address that is used when initiating connection. For client, this is the source address used when opening a TCP/IP connection from InterSystems IRIS. For server, this is the IP address that the InterSystems IRIS process will accept connections on when opening a TCP/IP connection. /BINDTO=address is used to control which network interface the connection will use. /BINDTO or /BINDTO="" deletes a previously specified address. If the specified address does not exist, the OPEN command will time out. | |
| /CLOSELISTEN | (Server only) Prevents more than one remote connections to the listening port. If specified, the listen socket is closed after the first connection is accepted. Additional clients attempting to connect will time out on the OPEN command. | |
| /CONNECTIONS=n or /CON=n | 5 | Corresponds to the queuesize positional parameter, which determines how many client jobs can queue for a connection to the server. |
| /HOSTNAME=str or /HOS=str | No default | Corresponds to the hostname positional parameter, which is either the name of an IP host or an IP address in IPv4 or IPv6 address format. You can use the /USEIPV6 keyword to specify which protocol to use. Further details on IPv4 and IPv6 formats can be found in the section "Use of IPv6 Addressing" in the chapter "Server Configuration Options" in the Orientation Guide for Server-Side Programming. |
| /IBUFSIZE=n or /IBU[=n] | 1024 | Corresponds to the ibufsiz positional parameter, which specifies the size of the TCP input buffer that holds data read from the network, but not yet delivered to the application. |
| /OBUFSIZE=n or /OBU[=n] | 1024 | Corresponds to the obufsiz positional parameter, which specifies the size of the TCP output buffer that contains data that is held between successive "SEND" operations. |
| /PORT=n | No default | Corresponds to the port positional parameter, which is either the TCP port number or a service name to use for the connection. |
| /SOCKET=n or /SOC=n | No default | Corresponds to the "G" mode parameter character, which causes the port positional parameter to be interpreted as the socket descriptor of an already opened data socket. This keyword takes as its value that socket descriptor and is used instead of the /PORT=n keyword. (A socket descriptor is passed to ObjectScript from another programming environment, such as C, using the InterSystems IRIS Call-in or Call-out mechanisms.) |
| /USEIPV6 | No default | If /USEIPV6 or /USEIPV6=1 is specified, use an IPv6 address for both inbound and outbound connections, overriding the IPV6 system switch. If /USEIPV6=0 is specified, use an IPv4 address for both inbound and outbound connections, overriding the IPv6 system switch. If /USEIPV6 is not specified, the IPV6 system switch governs behavior. With IPV6 system switch set, an outbound connection tries to connect with an IPv4 address first; if fails it tries to connection with an IPv6 address. For an inbound connection, the TCP device listens to both IPv4 and IPv6 connections. With IPV6 not set, only IPv4 addresses are used for both inbound and outbound connections. |
The following example shows a TCP/IP device being opened using keyword syntax:
SET dev = "|TCP|" _ 123 SET portnum = 57345 OPEN dev : ( / PSTE : / HOSTNAME = "128.41.0.73" : / PORT = portnum )
Current TCP Device
You can return the IP address and port number of the current TCP device using the methods of the %SYSTEM.TCPDevice![]() class. You can list these methods using the Help() method, as follows:
class. You can list these methods using the Help() method, as follows:
DO $SYSTEM . TCPDevice . Help ( )
You can display information about a specific method by specifying the method name in Help(), as shown in the following example:
DO $SYSTEM . TCPDevice . Help ( "LocalAddr" )
USE Command for TCP Devices
The USE command issued from either the client or server lets you prepare to send or receive data using a TCP connection you previously opened. It has the following syntax (colons must be specified as shown):
USE devicename:(::mode:terminators)
where
| devicename | A string of the form |TCP| followed by some number of numeric digits. The numeric portion of the device name is called the device identifier. If the port number is not specified in the OPEN parameters, this device identifier must be a unique five-digit TCP port number. If the port number is specified in the OPEN parameters (which is the preferred practice), this device identifier can be any unique number, so long as all the TCP device names used by a single job are distinct. |
| mode | Optional — USE supports the same mode parameters as OPEN. See "OPEN and USE Command Keywords for TCP Devices." |
| terminators | Optional — A list of up to eight user terminator characters that will terminate reads on the TCP binding device. It does not make sense to specify both T mode and user terminators at the same time, but if you do then T mode is ignored. |
The simplest form of USE takes its mode and terminators parameters from the OPEN command, as shown in the following example:
You can replace, add, or delete mode parameters and user terminators after the device has been opened.
To replace the parameters specified in OPEN, specify replacement values in USE. In the following example, the USE command replaces the OPEN mode with PSTE mode and turns off any user terminators:
To add to or delete from the mode parameters specified in OPEN, use the "+" sign to introduce mode parameters that will be turned on, and the "-" sign to introduce mode parameters that will be turned off. If you do not specify either "+" or "-", the new set of mode parameters replaces the existing mode parameters. In the following example, the USE command turns off Q mode (send immediate) and turns on W mode (wait). It leaves the rest of the mode string unchanged:
In the following example, the USE command leaves the mode string unchanged and specifies a new set of user terminators.
USE "|TCP|4" : ( : : "+" : $CHAR ( 3 , 4 ) )
READ Command for TCP Devices
Issue the READ command from either the server or the client to read any characters set by either the client or the server.
The syntax is as follows:
READ var:timeout READ *var:timeout READ var#length:timeout
The timeout argument, though optional, is strongly recommended because the success or failure of the READ is indicated by the value of the $TEST special variable if timeout is specified. $TEST is set to 1 if the read attempt succeeds before the timeout expires; if the timeout expires, $TEST is set to 0.
The timeout argument supports seconds and fractions of a second to 1/100th of a second. For example, 10, 10.5, .5, .05.
For an SSL connection, a job can wait in the first read or first write command if the other party never issues a read or write command after the connection is established. In this circumstance, InterSystems IRIS supports the read timeout for a READ command and write timeout (with /WRITETIMEOUT=n option) for a WRITE command. If there is no read or write timeout specified, then the job will wait until the other party issue a read or write command.
You can determine the number of reads performed by the current TCP connection using the TCPStats()![]() method of the %SYSTEM.INetInfo
method of the %SYSTEM.INetInfo![]() class.
class.
READ Modifies $ZA and $ZB
Your application can learn about how the connection and read succeeded by testing the values of $ZA and $ZB.
$ZA and READ Command
$ZA reports the state of the connection. When the 0x1000 bit (4096) is set, this TCP device is functioning in Server mode. When the 0x2000 bit (8192) is set, the device is currently in the Connected state talking to a remote host.
For example, assume that a server-side TCP device is expected to accept a new TCP connection. By looking at $ZA and $TEST after an initial timed read, the InterSystems IRIS program can distinguish among three cases:
| $ZA Value | $TEST Value | Meaning |
|---|---|---|
| 4096 | 0 | No connection has been accepted. |
| 12288 | 0 | Connection accepted, no data received. |
| 12288 | 1 | Connection accepted and data received. |
The following table shows what each bit in $ZA represents.
| Decimal Value of $ZA | Hexadecimal Value of $ZA | Meaning |
|---|---|---|
| 2 | 0x2 | Read timed out. |
| 4 | 0x4 | I/O error. |
| 256 | 0x80 | Bad escape sequence received. |
| 4096 | 0x1000 | Server mode. |
| 8192 | 0x2000 | Connected. |
$ZB and READ Command
$ZB holds the character that terminated the read. This character can be one of the following:
-
A termination character, such as a carriage return
-
The yth character of a fixed-length READ x#y
-
The single character of READ *X
-
An empty string after a timed read expires
-
An escape sequence
Note that if a string is terminated with CR LF, then only the CR is placed in $ZB.
WRITE Command for TCP Devices
The WRITE command sends data to a TCP device from the client or the server after you have established connection with OPEN and USE.
The syntax is as follows:
How WRITE Works
WRITE x sends x from the client or server to a buffer after the connection has been established.
WRITE ! and WRITE # do not indicate line and form feed. Instead, they tell InterSystems IRIS to flush any characters that remain in the buffer and send them across the network to the target system.
You can determine the number of writes performed by the current TCP connection using the TCPStats()![]() method of the %SYSTEM.INetInfo
method of the %SYSTEM.INetInfo![]() class.
class.
WRITE Modifies $X and $Y
InterSystems IRIS stores the number of characters in the buffer in the $X special variable.
The ASCII characters <return> and <line feed> are not included in this count, as they are not considered part of the record. Flushing the buffer with WRITE ! resets $X to 0, and increases the value of $Y by 1. Flushing the buffer with WRITE # writes the ASCII character <form feed> as a separate record, and resets $Y to 0.
WRITE Command Errors
You can receive a <WRITE> error in any of the following circumstances.
-
If you exceed the maximum string size (1024 characters) without flushing the buffer.
-
If you flush the write buffer when there are no characters in it (TCP/IP ignores records of 0 length).
-
If you send a WRITE command from the server to the client before the server receives a connection request from client. (InterSystems IRIS produces the <WRITE> error on the server.)
WRITE Control Commands
The InterSystems IRIS TCP binding device supports a series of control commands with the WRITE *-n syntax.
| Syntax | Description |
|---|---|
| WRITE *-2 | On a server-mode session that is currently connected to a client, this command disconnects from the session. To accept a new session you then execute a new READ command on the device. |
| WRITE *-3 | Sends any buffered output out the TCP connection; that is, executes a TCP SEND operation on the data in the output buffer. If the data is compressed (/GZIP) stream data, *-3 sends the data without marking the compression endpoint. Resets $X to 0. Increments $Y by 1. If there is no buffered output, this command does nothing. |
| WRITE *-99 | Sends compressed (/GZIP) stream data. First marks the data in the output buffer with a compression endpoint, then sends this compressed stream data by executing a TCP SEND operation on the output buffer data. |
Connection Management
The server maintains only one connection at a time. If a second client tries to connect while another connection is open, TCP/IP places that client in a queue. While in the queue, the second client can write to the port as if it were connected. The data the second client writes remains in a buffer until the first connection is closed and the second client connects.
The second client hangs if it issues a READ before the connection exists. Any connection attempt by a third client while the second one is in the queue fails.
If a client that has already opened a TCP device tries to connect a second time while the first connection still exists, the second OPEN command causes a <COMMAND> error. Treating this situation as an error rather than as a USE command prevents surprising results. Such unexpected results could occur if an erroneous program thinks it has opened a new connection, when it is actually reusing an existing connection that may have a different destination or different parameters.
To handle multiple clients, see below.
Job Command with TCP Devices
You can use the JOB command to implement a TCP concurrent server. A TCP concurrent server allows multiple clients to be served simultaneously. In this mode, a client does not have to wait for the server to finish serving other clients. Instead, each time a client requests the server, it spawns a separate subjob for that client which remains open as long as the client needs it. As soon as this subjob has been spawned (indicated by the return of the JOB command), another client may request service and the server will create a subjob for that client as well.
Client/Server Connections in the Non-Concurrent and Concurrent Modes.
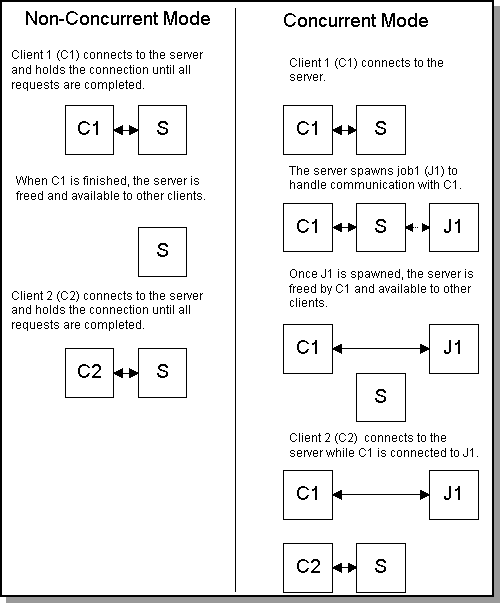
A concurrent server uses the JOB command with the switch concurrent server bit (bit 4 or bit 16) set. Bit 16 is the recommended setting.
-
If bit 4 is set, the JOB command passes to the spawned process the TCP device in the principal input and principal output process parameters. Whenever you include bit 4 in switch, you must specify the TCP device in both principal input and principal output process parameters. You must use the same device for both principal input and principal output. Use of bit 4 is not recommended; refer to the JOB command in the ObjectScript Reference for further details.
-
If bit 16 is set, the JOB command passes to the spawned process three separate devices for the TCP device, the principal input, and principal output process parameters. You specify two of these TCP devices in the JOB command, using the principal input and principal output process parameters. You can also default these parameters, as shown in the following examples: JOB child:(:16:input:output) or JOB child:(:16::)).
Refer to the JOB command in the ObjectScript Reference for further details.
Before you issue the JOB command, the device(s) you specify for principal input and principal output must:
-
Be open
-
Be listening on a TCP port
-
Have accepted an incoming connection
After the JOB command, the device in the spawning process is still listening on the TCP port, but no longer has an active connection. The application should check $ZA after issuing the JOB command to make sure that the CONNECTED bit in the state of the TCP device was reset.
The spawned process starts at the designated entry point using the specified TCP device. The TCP device has the same name in the child process as in the parent process. The TCP device has one attached socket. The inherited TCP device is in S (stream) mode. However, the child process can change the mode with a USE command. We recommend that the server open TCP device in the A (accept) mode.
The TCP device in the spawned process is in a connected state: the same state the device would receive after it is opened from a client. The spawned process can use the TCP device with USE 0 or USE $P. It can also use the TCP device implicitly (if switch=4). However, for the following reasons switch=16 is preferable to switch=4:
-
When switch=4, if a <READ> error occurs on the principal device, the job simply halts, without taking an error trap. This is because when switch=4 the TCP device is the principal device. To support error trapping, use switch=16 and specify another device for the TCP device.
-
When switch=4, if the remote TCP device closes down the connection, the job simply halts, without taking an error trap. To override this default behavior and generate a <DSCON> error, you must set the DisconnectErr()
 method of the %SYSTEM.Process class.
You can use the %SYSTEM.Socket![]() class methods, rather than the JOB command, to create concurrent TCP server connections. However, note that the %SYSTEM.Socket
class methods, rather than the JOB command, to create concurrent TCP server connections. However, note that the %SYSTEM.Socket![]() methods assume that the worker jobs are already started. You can use these methods for concurrent TCP server connections if you do not need the listener job to start the worker jobs, and the listener job knows Process IDs (PIDs) of the worker jobs.
methods assume that the worker jobs are already started. You can use these methods for concurrent TCP server connections if you do not need the listener job to start the worker jobs, and the listener job knows Process IDs (PIDs) of the worker jobs.
Job Command Example
The following example shows a very simple concurrent server that spawns off a child job whenever it detects a connection from a client. JOB specifies a concurrent server bit switch value (value 16) and passes the symbol table (value 1): 16+1=17.
server SET io = "|TCP|1" SET ^serverport = 7001 OPEN io : ( : ^serverport : "MA" ) : 200 IF ( ' $TEST ) { WRITE ! , "Cannot open server port" QUIT } ELSE { WRITE ! , "Server port opened" } loop USE io READ x ; Read for accept USE 0 WRITE ! , "Accepted connection" JOB child : ( : 17 : io : io ) ;Concurrent server bit is on GOTO loop child WRITE $JOB , ! ; Send job id on TCP device to be read by client QUIT client SET io = "|TCP|2" SET host = "127.0.0.1" OPEN io : ( host : ^serverport : "M" ) : 200 ;Connect to server IF ( ' $TEST ) { WRITE ! , "cannot open connection" Quit } ELSE { WRITE ! , "Client connection opened" USE io READ x # 3 : 200 ;Reads from subjob } IF ( ' $TEST ) { WRITE ! , "No message from child" CLOSE io QUIT } ELSE { USE 0 WRITE ! , "Child is on job " , x CLOSE io QUIT }
The child uses the inherited TCP connection to pass its job ID (in this case assumed to be 3 characters) back to the client, after which the child process exits. The client opens up a connection with the server and reads the child's job ID on the open connection. In this example, the IPv4 format value "127.0.0.1" for the variable host indicates a loopback connection to the local host machine. You can set up a client on a different machine from the server if host is set to the server's IP address or name. Further details on IPv4 and IPv6 formats can be found in the section "Use of IPv6 Addressing" in the chapter "Server Configuration Options" in the Orientation Guide for Server-Side Programming.
In principle, the child and client can conduct extended communication, and multiple clients can be talking concurrently with their respective children of the server.
Note that this simple example does not contain logic for detecting and handling disconnects or failed read operations.
Concatenation of Records
In certain situations, TCP concatenates separate records to form a single record. Concatenation can occur if a client or server process issues a series of WRITE commands to a TCP port, separated by WRITE ! or WRITE # commands to flush the buffer, whether or not a READ command is waiting at the other end of the connection.
The first example below outlines how Process A receives two separate records when it has a READ command waiting as Process B writes two records to the TCP port.
Process A Process B %SYS> USE "|TCP|41880" R A U 0 W A %SYS> USE "|TCP|41880" WRITE "ONE",!,"TWO" <RETURN> <RETURN> ONE %SYS> USE 41880 R A U 0 W A <RETURN> TWO
The second example outlines how Process A receives one concatenated record when it issues its READ command after Process B has finished writing two records to the TCP port.
Process A Process B . %SYS> USE "|TCP|41880" WRITE "ONE",!,"TWO" . <RETURN> ONE %SYS> USE "/TCP/41880" R A U 0 W A <RETURN> ONETWO
Multiplexing InterSystems IRIS TCP Devices
The %SYSTEM.Socket![]() class provides methods for multiplexing InterSystems IRIS TCP devices. The Fork() and Select() methods allow you to have a single job handling both accepting new connections and reading data from a connected TCP device at the same time. After a listening TCP device received a connection, use Fork()
class provides methods for multiplexing InterSystems IRIS TCP devices. The Fork() and Select() methods allow you to have a single job handling both accepting new connections and reading data from a connected TCP device at the same time. After a listening TCP device received a connection, use Fork()![]() to create a new TCP device for reading data. The original listening TCP device continues to accept incoming connections. You use the Select()
to create a new TCP device for reading data. The original listening TCP device continues to accept incoming connections. You use the Select()![]() method to wait for both listening and connected TCP devices. When a new connection arrived or data becomes available, Select() returns the device name that was signaled.
method to wait for both listening and connected TCP devices. When a new connection arrived or data becomes available, Select() returns the device name that was signaled.
You can use the Select()![]() , Publish()
, Publish()![]() , Export()
, Export()![]() , and Import()
, and Import()![]() methods to have a listener job accept an incoming connection and pass the connected device to a worker job. This worker job could communicate with the remote client.
methods to have a listener job accept an incoming connection and pass the connected device to a worker job. This worker job could communicate with the remote client.
For further details and program examples, refer to the %SYSTEM.Socket![]() class in the InterSystems Class Reference.
class in the InterSystems Class Reference.
Closing the Connection
Either the client or the server can end a TCP binding connection. The preferred way to close a connection is for the client to issue a CLOSE command for the TCP device. (Alternatively, the client may issue HALT command.) The server should then issue another READ command to that device and receive a <READ> error, then issue a CLOSE command for the TCP device.
The reason for this sequence is that, in accordance with the TCP/IP standard, connection resources are maintained for two minutes after a CLOSE, but only for the "active closer" — the process that performs the CLOSE first. Thus it is preferable to close the client first, because the resources of the server are usually more limited than those of the clients.
Disconnect with CLOSE Command
Issue this form of the CLOSE command from the client or server:
As stated above, it is preferable for the client to issue the CLOSE command first. If the server issues the CLOSE command first, the client gets a <WRITE> error and should then issue a CLOSE command.
JOBSERVER Resources
If you are writing an InterSystems IRIS server to interface with clients over which you have no control, the server process must issue the CLOSE to close the TCP connection. The CLOSE command does close the connection as far as InterSystems IRIS is concerned, but internally TCP/IP retains resources for this connection on the server for up to two minutes.
This can have unexpected results when JOBSERVERs are used to service TCP/IP jobs. When a JOBSERVER process performs a halt, the process immediately returns to the pool of available JOBSERVER processes, but its resources are retained internally for up to two minutes. Because JOBSERVER processes are assigned on a first-available basis, it is possible for a heavy load from a relatively small number of clients to exhaust the resources of a JOBSERVER process.
To avoid this problem, a TCP/IP server opened by a JOB running under a JOBSERVER should explicitly issue a CLOSE, and then issue a brief HANG before the final QUIT (or HALT) command. In accordance with TCP/IP specification, a HANG 120 is required to guarantee no resources remain in use between incarnations in JOBSERVER. In practice, a HANG of one second is usually sufficient to evenly distribute resource load among JOBSERVER processes.
Automatic Disconnection
The TCP binding connection closes automatically under these conditions:
-
An InterSystems IRIS fatal error
-
RESJOB of the client or server process
-
iris stop
-
iris force
Effects of Disconnection
The effect of a disconnection on data remaining in the output buffer is determined by the /CLOSEFLUSH setting established during OPEN or USE. The default is to flush the data.
If one side closes a connection but the other side issues new WRITE commands, the first of these WRITE commands may succeed. Any additional WRITE commands receive a <WRITE> error.
From the client side, all READ commands to the side that closed the connection receive <READ> errors. The device must be closed and reopened to reestablish communication with the server.
From the server side, the first READ after a <READ> or <WRITE> error waits for and accepts a new connection.
You can use the %SYSTEM.TCPDevice.GetDisconnectCode()![]() method to return the internal error that resulted in a <READ> or <WRITE> error on the current TCP device. $IO must be a TCP device.
method to return the internal error that resulted in a <READ> or <WRITE> error on the current TCP device. $IO must be a TCP device.
A Multi-client Server Design Pattern Using Simple Tcp/ip Messaging
Source: https://docs.intersystems.com/irislatest/csp/docbook/DocBook.UI.Page.cls?KEY=GIOD_TCP
0 Response to "A Multi-client Server Design Pattern Using Simple Tcp/ip Messaging"
Post a Comment